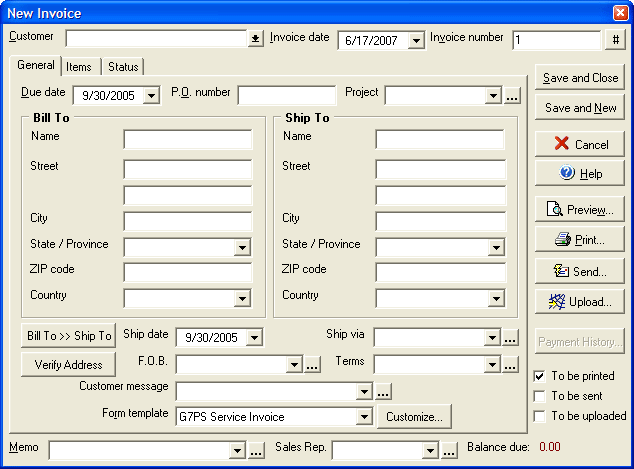
General Tab

- Select a Customer name from the drop down list of names from your payor/payee list or type in a new name.
- Enter the Invoice date as you want it to appear on the final invoice.
- Enter a number for the invoice in the Invoice number field. (When creating a new invoice, click the # button to increase the invoice number by 1.)
- Enter the Due date for when the invoice should be paid.
- Enter a P.O. number for this invoice.
- In the section marked Bill To enter the name and address for billing information.
- In the section marked Ship To enter the name and address to which to ship any related deliveries. You may set this the same as the Bill To address by clicking the Bill To » Ship To button.
- From the Ship via pull down menu select the method of shipping related to the invoice. (By clicking the ellipsis "..." button you may add new items to this list.)
- In the F.O.B. (Field on Board) field, enter the shipping destination. (By clicking the ellipsis "..." button you may add new items to this list.)
- In the Terms field you can enter the terms of the related delivery. (By clicking the ellipsis "..." button you may add new items to this list.)
- The Customer message pull down menu allows you to select an optional message to be added to the invoice. (By clicking the ellipsis "..." button you may add new items to this list.)
- Select the Print template from Standard or a template you have customized using the Customize button.
- The Memo field allows you to add an optional Memo to your invoice. (By clicking the ellipsis "..." button you may add new items to this list.)
Use the Items tab to add any items to the invoice or estimate. Once you have finished entering information click Save and Done to save the invoice and close the dialog box or select Save and New to save the current invoice and then start a new invoice. You can preview how the invoice will appear upon print out by selecting the Preview button, or you can print the invoice directly by selecting print. To view any available payment history for the current invoice, select the Payment History button; this will show any customer payments made to this invoice transaction. Click the Send Invoice button to open the Send Invoice wizard. By clicking the Verify Shipping Address button, you can verify the street address of the shipping destination.