|
 Once
you have set up an Invoicing account, added some contacts to your
Address Book, and created some items for the Items List you are
then ready to start creating invoices and estimates. This tutorial
will cover creating an invoice, however the process for creating
an estimate is more or less the same and once you have created an
estimate you can instantly convert it into an invoice with just
a mouse click! There are several ways to open your invoicing account
from where you can start creating invoices. From the My Accounts
screen double click on the name of the invoicing account to open
or from the left-hand Navigation Panel under the Business menu click
on the Invoices icon. Once
you have set up an Invoicing account, added some contacts to your
Address Book, and created some items for the Items List you are
then ready to start creating invoices and estimates. This tutorial
will cover creating an invoice, however the process for creating
an estimate is more or less the same and once you have created an
estimate you can instantly convert it into an invoice with just
a mouse click! There are several ways to open your invoicing account
from where you can start creating invoices. From the My Accounts
screen double click on the name of the invoicing account to open
or from the left-hand Navigation Panel under the Business menu click
on the Invoices icon.
To begin creating a new invoice, click on the New button
at the top of the Invoicing account screen (to edit an existing
invoice, highlight an invoice in the list and click the Edit
button.) This will open the Invoice dialog in which you will begin
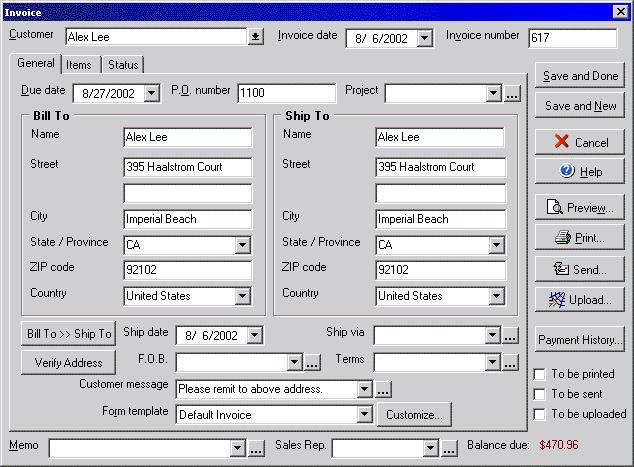
creating the invoice. The first section of the Invoice dialog box
is the General tab.

- Use the Customer pull down menu to select the recipient
of the invoice. (This list will consist of all the names from
your Address Book.)
- Enter the date to associate with the invoice in the Invoice
Date field, the current date is the default for this field.
- Enter an identification number in the Invoice Number
field.
- Select a Due date for when the invoice payment is expected.
- In the P.O. number field enter the number of your customers
purchase order, if any, which you are fulfilling.
- You may type a title or name in the Project field for
reference (this can be used to generate reports later from the
Reports menu.)
- In the Bill To section the customer name and address
will appear as it was entered in the Address Book. You may edit
this information as needed.
- In the Ship To section the customer name and address
will appear as it was entered in the Ship to section of the Address
Book. You may edit this information as needed.
- If the information in the Ship To section should match that
of the Bill To section you can duplicate it by clicking the Bill
To >> Ship To button.
- The Ship Date field allows you to specify the date on
which the invoice items will be shipped.
- Using the Ship via field enter the shipping method to
be used.
- By Clicking the Verify Address button you can verify the address
against the USPS address database. (Note: any invoices you upload
will automatically verify the address and must have a verifiable
address to be uploaded successfully.)
- In the F.O.B. (Field on Board) field enter the shipping
destination.
- Enter the terms of delivery in the Terms field.
- Select a customer message to appear on the invoice, or leave
it blank if you don't wish to add a message. (By clicking the
ellipsis "..." button you may add new items to this
list.)
- From the Form template field select one of the preset
templates to determine how your invoice will appear when printed
(click the Preview button to view how the print out will
look). By clicking the Customize... button you can change the
layout and style of the invoice template.
- If you wish to add a memo to the invoice, type it into the Memo
field.
- If there is a sales representative that works with the account
for the customer for which you are creating this invoice you can
add the name to the Sales Rep. field.
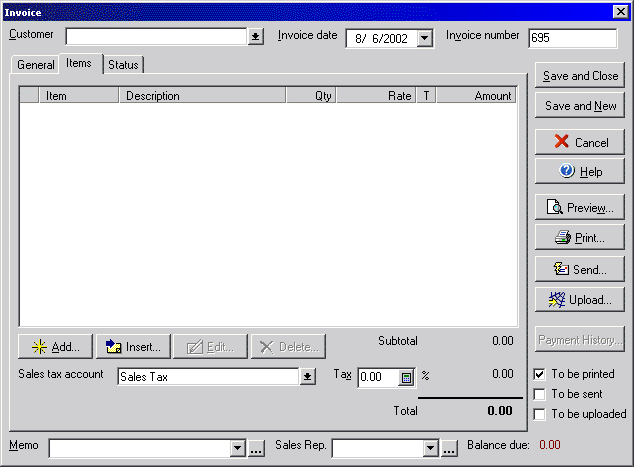
After you enter the general customer and shipping information you
can add items to your invoice by clicking on the Items tab.

- Click the Add button to add the first item to the invoice.
The Invoice Item dialog box will open (see below).
- As you add items to the invoice you can edit or remove items
you have added previously by single clicking an item and then
clicking Edit or Delete.
- When you create your first invoice account a Sales Tax account
is created by default. If you would like to record sales tax to
another sales tax account you have created, select it from the
Sales tax account drop down menu. Use the Tax field
to enter the correct percentage for sales tax if necessary.

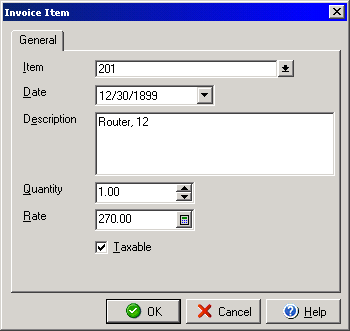
- When you click either the New or Edit buttons
in the Items section of the Invoice dialog, the Invoice Item box
will appear.
- Choose an item to add to your invoice from the Item drop
down menu.
- Select the Date to list for this particular item (the
default is the current date.)
- The Description will match the sales description you
entered when you created the item in the item list (Tutorial
step 3). You may add to or edit this description for this
particular invoice if you wish.
- Enter the number of this item to include on this invoice in
the Quantity field.
- The Rate will appear as what you entered in the Price
field when you set up this item, you may change it here if you
wish.
The Status tab of the invoice dialog box is simply a quick way
for you to track how many times you have printed, e-mailed, or uploaded
an invoice. The list will show the number next to each option, as
well as a Qchex Authentication Code that verifies that you have
successfully upgraded the invoice to Qchex.
The final step of creating your first invoice is to choose how
it will be delivered and then to save it. In the bottom right-hand
corner are 3 check boxes that determine how your invoice will be
delivered, they are: To be printed, To be sent, and
To be uploaded. The first option sets the invoice up to be
printed, the second to be e-mailed and the third to be uploaded.
By checking one or more of these boxes you can then save and close
the invoice and access it later with other invoices of the same
delivery type (e.g., if you have created a bunch of invoices with
the To be sent option checked, when you select Send >
Send Invoices from the main File menu, the batch process window
for sending invoices will open showing all of the invoices that
you created with the To be sent box checked.) You may also click
either the Print, Send or Upload button in
the Invoice box to immediately print, e-mail, or upload your invoice.
If you wish to see a preview of how your invoice will look, click
the Preview button. To Save your invoice and close the Invoice
dialog box click the Save and Done button, if you wish to
immediately start work on another invoice click the Save and
New button.
|


