(General tab)
The Purchase Order dialog allows you to create and edit Purchase orders and
can be opened by selecting New Purchase Order from the business window.
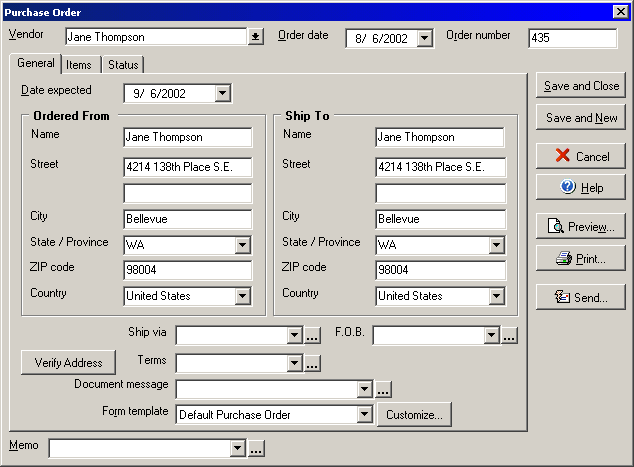
- Select a name from the Vendor drop down menu.
- Enter the date in the Order date drop down menu.
- You can assign a reference number to the order in the Order number field.
- The Date expected field allows you to enter the expected receive date for
the shipment.
- In the Remit To fields enter the address in which the vendor should send
the bill.
- In the Ship To fields enter the address where the vendor should ship the
order.
- Enter the shipping method in the Ship via field. (By clicking the ellipsis
"..." button you may add new items to this list.)
- In the F.O.B. (Field on Board) field, enter the shipping destination. (By
clicking the ellipsis "..." button you may add new items to this
list.)
- In the Terms field you can enter the terms of the related delivery. (By
clicking the ellipsis "..." button you may add new items to this
list.)
- The Document message field allows you to enter a text message regarding
the order.
- Select the Form template to use, either the Default Purchase Order form
or a customized template.
- You may add a Memo to the order in the Memo field.
- The Closed field indicates that the order has been closed after all items
have been received.
Click Save and Done to save the current order and close the window or Save and
New to save the current order and start working on a new one. The Preview button
will allow you to view on screen a draft of what the printed order will look like.
Click the Send button to open the Send Documents wizard.
Click the Items tab of the Purchase Order dialog to
add or edit items on the order or click the Status tab
to view a history of how many times the purchase order has been printed or sent.