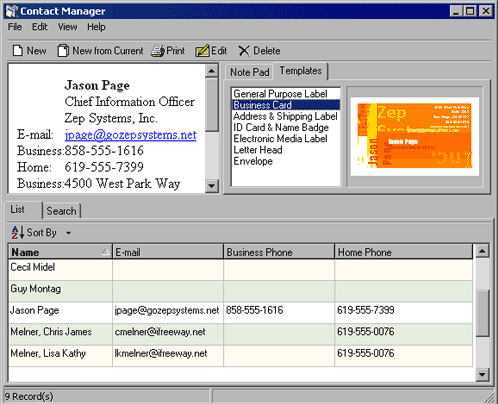
The Contact Manager stores all of the name and contact information for your contacts.
You may add, edit or delete entries from your Contact Manager by selecting Contact Manager from
the Data menu.

By clicking on a name in the contact list at the bottom of the Contact Manager you can view the
information for that contact in the view window in the upper left corner. Any notes created for
this contact will appear in the Note Pad window in the upper right part of the Contact Manager
window. You may add notes to the Note Pad by clicking the Insert option and typing a new note
directly into the window and then clicking Save if you wish to keep the note or Cancel to delete
it. Each time you add a note it prefixes the note with your name and the date and time you added
the note. You may Edit the note pad to alter previous entries or to add new items without the
name, date and time prefix. (Note: Information added with the Other tab
of the Contact Information window will not add the name, date and time prefix.) The Templates
tab allows you to view any default templates you have set up for the contact using the Templates
tab of the Contact Information window.
- New: Add a new user to the Address Book
- New from Current: Creates a copy of the current highlighted contact so that you may create
a new entry using some or all of the same information
- Edit: Opens the current highlighted contact so that you may edit the data
- Delete: Remove the current highlighted contact from the Address Book
You can also use the File menu in the Contact Manager to open a vCard or save a vCard. The vCard
is a new standard for electronic business cards, developed by Versit Consortium (http://www.versit.com)
and maintained by the Internet Mail Consortium (IMC, http://www.imc.org).
The vCard is basically a small file that contains information, name, addresses, pictures, logos,
etc that can then be automatically opened or imported by a wide variety of software (Microsoft
Outlook, Outlook Express, Netscape Communicator, etc.) Because the vCard is a small, self contained
file it can easily be attached to email or sent to PDA's, etc.

You can quickly locate contacts in the Contact Manager by using the Search function to use one
or more data fields as a filter to limit the contacts that are displayed in the list. By typing
in the search criteria and clicking Find you may view all contacts who match the given search
criteria. Clicking the Clear icon will remove the information you have entered into the search
fields.
By default the Show Options check box is unchecked and will show only the first 2 search fields,
the first of the 2 fields shows the data type to use as a filter and the second allows you to
enter the search information to be matched. (For example, you could select First Name in the data
type field and then enter the letter "P" in the second field and the search would return
all contacts whose first name start with a "P") Clicking the Show Options check box
will show the complete set of search controls.
The Search Fields offer 6 data types to use for filtering results: Business Phone, Home Phone,
First Name, Last Name, Name (full), and Email. Depending on the Search Options you select you
will have either one or two search filters to use in narrowing your search selections. The Combination
of search fields options allows you to use both fields in combination:
- None: Only the first Search field is used.
- AND: Returns only contacts where both search criteria are matched.
- OR: Returns any contacts where either one of the search criteria are matched.
Checking the NOT box means that the opposite of the search criteria must be true to return a result.
(For example, if you searched the Last Name field with the letter "P" as the search
criteria and had the NOT check box checked and the drop down Match if box set to STARTS WITH then
the results will return all contacts where the last name starts with any letter except
"P".) The Match if drop down list allows you to determine the type of comparative operation
used for filtering. The options for comparison are:
- = : Returns items that match the search criteria exactly
- <> : Returns items that do not match the search criteria exactly
- < : Returns items that are less than the search criteria
- <= : Returns items that are less than or equal to the search criteria
- > : Returns items that are greater than the search criteria
- >= : Returns items that are greater than or equal to the search criteria
- Starts With: Returns items that start with the same letter or number as the search criteria
- Sounds Like: Returns items that are similar, but not necessarily exactly the same as the search
criteria
- Ends With: Returns items that end with the same letter or number as the search criteria

