|
The Address Book in Smart Invoice allows you to keep all of the
contact information about your associates in one place for immediate
use in creating and sending invoices, estimates, bills, etc. You
can create new contacts or payees as you need to add them, or you
can import the information from Quicken, QuickBooks, etc.
|
 You can access the Address Book by clicking the Address Book
Icon in the yellow Navigation Panel on the left side of your
screen. (If you do not see the yellow menu on the left side
of your screen, please go to the View menu and make sure that
a check mark appears next to the Navigation Panel menu item
to insure that this option is turned on.) You can also select
the Address Book option from the View menu. The Address Book
screen will show you a list of all the contacts you currently
have available, as well as the address, phone number, and
e-mail for each of them. You may sort the list by Name, address,
group, etc. or you may use the Search function to filter the
list for specific criteria.
|
|
When you add a new contact to the Address Book in Smart Invoice
& Estimates there are are 4 sections you may use for recording
information about that contact:
|
General
Name
Address
Phone
E-mail
|
Financial
Transaction Settings
Check Draft Settings
|
Miscellaneous
Notes
Custom Field 1
Custom Field 2
Custom Field 3
Source
|
Customer Information
Customer number
Shipping Address |
You may use as many or as few of the fields as you need for
a customer as long as the contact has a name entered, however
many of the features in Smart Invoice will require other pieces
of information such as address or e-mail so it's best to enter
as much information about a contact as you have available. To
start creating a new entry in your Address Book click the New
button at the top of the Address Book screen.
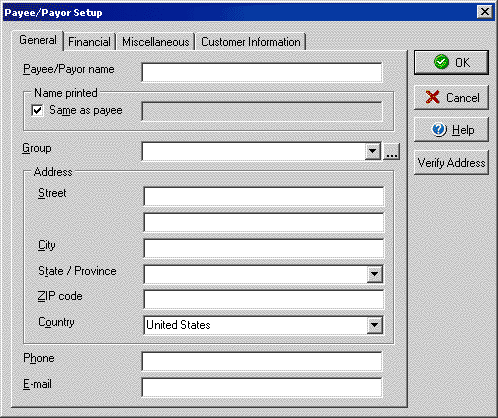
General Tab

- In the Payee/Payor name field enter the name of
the contact that you will use to label this contact.
- In the Name printed: Same as payee field enter
how the name should appear in print on invoices, purchase
orders, etc. if different than in step 1.
- From the pull down Group menu you may select a
group with which to associate the contact (helpful in filtering
groups of contacts in the search feature).
- In the Address section enter a street address for
the location of the contact. (You will be able to add a
different shipping address in the Customer Information section
if needed.)
- Enter the contact's phone number in the Phone field.
- Enter the contact's e-mail in the E-mail field.
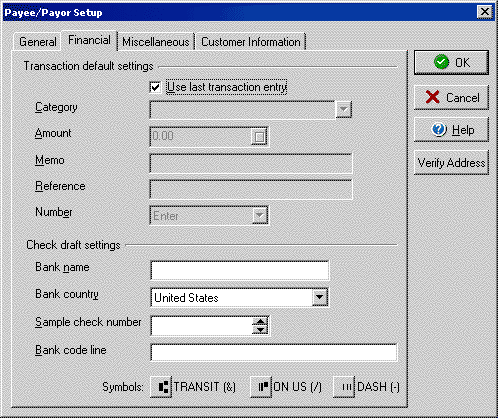
Financial Tab

- Leave the Use last transaction check box checked.
This will always start payments, check drafts, etc. from
this contact with the details of the last transaction displayed.
- If you will be using account information from this contact
to create check draft payments, you should complete the
Check draft settings section.
- Enter the contacts bank name in the Bank name
field.
- Select the Bank country from the pull down menu.
- Enter a Sample check number as a place holder
in the check number field, it does not need to be the
exact number of a check draft to be created.
- Using the Symbols buttons and the numeric keys
of your keyboard enter the Bank code line EXACTLY
as it appears on the contacts check/account without the
check number (It is a good idea to ask the contact to
provide a voided copy of a check to use as a guide.)
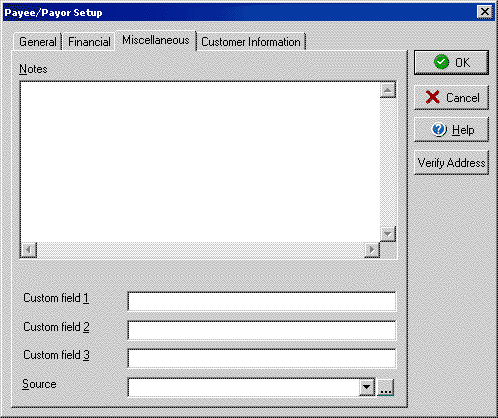
Miscellaneous Tab

- Enter any comments or notes you wish to add in the Notes
type box. These notes will appear in the Notes field of
the Address Book screen when a contact is selected.
- The 3 Custom field type fields can be used to store
additional information about the contact. It is a good idea
to use a consistent selection for each field for search
purposes (for example, you might use field 1 to list the
contact's fax number for each contact you add to the Address
Book. In this way you always know that Custom field 1 is
the fax number).
- In the Source drop down menu select what to label as the
Source of the information about the current contact. This
is useful as another means of filtering or searching through
contacts.
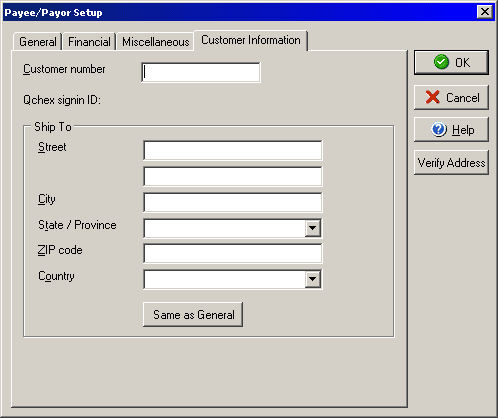
Customer Information Tab

- Enter a number to use as an ID for this contact in the
Customer number field.
- If the customer has a shipping address that is different
from the General address (found under the General tab) enter
it in the Ship To section, or click the Same as
General to copy over the first address.
You may also import contact or payee information directly
into your Address Book from other software. From the main
File menu select Import > Payees...
- The Import Payee Data wizard will open with a list of
formats and programs from which you may import the data.
- Single click the type to import, for example Peachtree
Vendor List, and then click Next.
- Click the Browse button and find the file to import.
- Use the drop down Source menu to select a label
for the Source field.
- Click Finish.
|
|
Once you have added one or more contacts into your Address Book you are
ready to add items to the Item List
so that you may start using these contacts to send and receive payments,
bills, purchase orders, invoices, etc.
Address Book
Address Book - Search
Payee Setup - General tab
Payee Setup - Financial tab
Payee Setup - Miscellaneous tab
Payee Setup - Customer Information tab
Check Drafts
Import Payees
|


