Write Checks
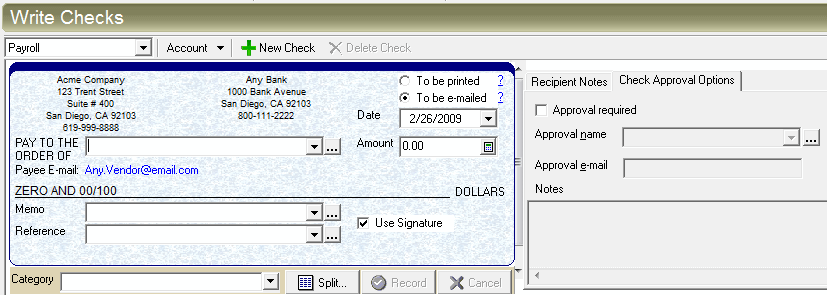
The Write Checks screen allows you to write checks drawn off of any bank or money market account that you setup with an electronic checkbook in VersaCheck. Using the pull down menu under the Write Checks header will allow you to choose from which account to draw the checks.
The Account button
- New Account: opens the New Account dialog box
- Edit Account: opens the Edit Account dialog box
- Edit Checkbook: opens the Checkbook Setup for accounts which use a checkbook
- Reconcile: opens the Reconcile wizard which allows you to reconcile an account from bank statements or other records
The New Check icon will clear the current check on screen once
you have finished a check, and allow you to write additional checks.

- Choose if the check should be printed or sent in the Number pull down menu.
- Correct the Date of the check if using a date other than the current day's date.
- Enter the total of the check in the Amount field.
- Use the pull down menu or type in a new name for the payee.
- Use the Memo field for whatever memo you wish to have printed on the check.
- The Reference field may be used to add personal reference information if you wish.
- The pull down menu for Category* can be used to assign a category for the check payment, for example "Job Expense" or "Health care."
- By using the Split button, you may itemize a check payment.
- If funding for the check must be approved, click the 'Approval required' check box. Click here for detailed instructions for check approvals.
Checks to be printed will be added to the list of checks under the To Print tab found underneath the check form. You may use the Sort filter to list checks according to date, number, payee, etc.
* Note: The Category field cannot be added or edited once you have created a check, so care should be taken in selecting the correct category for which to assign each transaction.