Step 3 of 3
The Print Checks wizard opens automatically when using VersaCheck for single pass printing from Money®, Quicken™ or QuickBooks™. (Note: the Wizard begins with Step 2 of 3 by default when operating properly.)
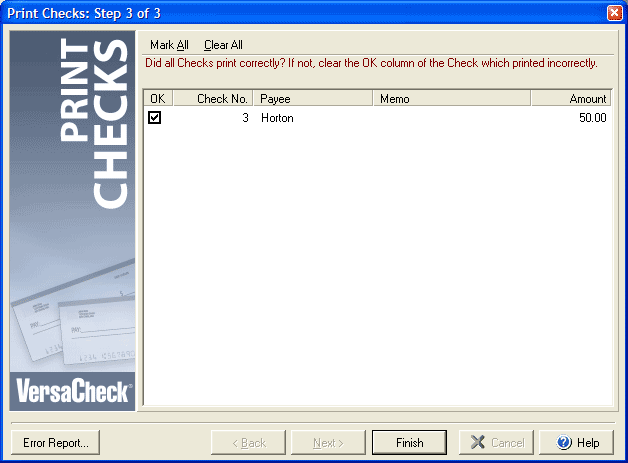
The final step of the Print Checks wizard simply allows you to reprint any checks that did not print correctly. Uncheck the check box next to any check(s) that did NOT print correctly. You may use the Mark All button to check all the boxes or Clear All to uncheck all the boxes if you have multiple checks listed. Click Finish to close the Print Checks wizard.
IMPORTANT NOTE ON CHECK PRINTING
When printing checks from other financial software it is important to select the proper print orientation for the check paper. VersaCheck only prints checks in the standard "portrait" print layout; to ensure proper printing of checks please make certain to select the correct printer orientation in your accounting software. For example:
| For Quicken™ Users: |
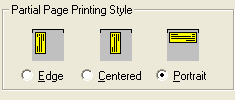 |
| In the Print Checks dialog select the Partial Page tab and make sure the
"Portrait" option is selected. |
| For QuickBooks™ Users: |
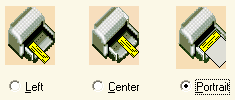 |
| Select File > Printer Setup > For Printing Checks and make sure
that the "Portrait" option is selected. |
| For Microsoft Money® Users: |
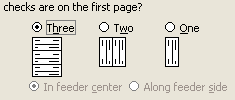 |
| In the Print Checks dialog, under the section for how many checks to print on the first page, you must select the option for "Three" regardless of how many checks you are printing. (The other options will not use the required, standard portrait layout for printing and your checks will not print correctly.) |