The Incoming Checks screen allows you to validate certain check information on checks you receive. From the main Business menu select Incoming Checks.
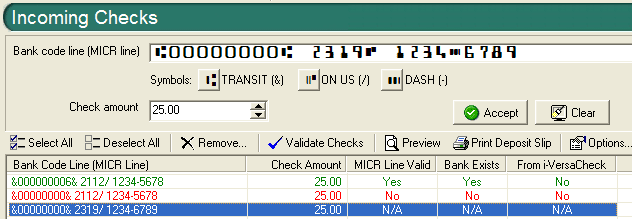
The Incoming Checks screen allows you to validate checks MICR line to determine if the MICR line as a whole is valid (well formed), if the routing number is from a real bank, and if the check was sent via the iVersaCheck system. (Note that the validation process does NOT check the account number or amount with any financial institutions.) You can enter the check information via a VersaScan 21 scanner or by entering the required data by typing it into the appropriate fields.
In the Bank code line (MICR line) field enter the whole bank code line exactly as it appears on the check. You can enter the symbols in the MICR line by using the buttons below or using the corresponding keyboard keys found in parenthesis after each symbol. Enter the amount of the check in the Check amount field and if the information is correct (from typing or scanning) click the Accept button (or Clear to clear the fields and start over). Once one or more checks appear in the main list you can run the verification process. First single click on a check to select it or click Select All to select the entire list and click the Validate Checks button. After the process is finished, checks that are valid will appear in green and checks that are not valid will be red.
You can remove one or more checks by selecting them and clicking the Remove... button. To print a deposit slip, select the check(s) to include on the deposit slip and click the Print Deposit Slip button. You'll be prompted to select which account to use and then once the slip is printed you can choose to remove all the checks that were included on the slip or to leave them in the list.
Clicking the Options... button will open the Incoming Checks Options dialog.